Monthly Archives: March 2009

Rich Chocolate Cake Recipe

Ingredients

(serves 12) not if I get there 1st it won’t!

* 200g good-quality dark chocolate, chopped

* 200g butter, softened

* 1 cup dark brown sugar

* 1 teaspoon vanilla extract

* 3 eggs, at room temperature

* 1 1/2 cups self-raising flour

* 2 tablespoons cocoa powder

* 1/2 cup milk

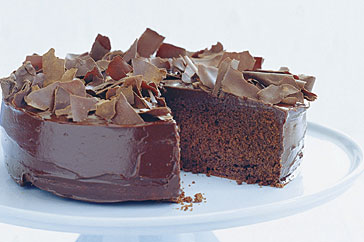
* chocolate curls or shavings (optional), to serve (see note)

Chocolate icing

* 200g good-quality dark chocolate, chopped

* 1/2 cup thickened cream

Serves 12? - no chance - serves me I think!

Method

1. Preheat oven to 170°C. Grease and line base and side of a 6cm deep, 22cm (base) round cake pan.

2. Place chocolate in a heatproof, microwave-safe bowl. Microwave, uncovered, on MEDIUM (50%) for 1 to 2 minutes, stirring every minute with a metal spoon, until almost melted. Stir until smooth. Set aside for 10 minutes to cool.

3. Using an electric mixer, cream butter, sugar and vanilla until light and fluffy. Add eggs, 1 at a time, beating after each addition. Add melted chocolate. Beat until well combined. Sift flour and cocoa together. Fold half the flour mixture into butter mixture. Add half the milk. Stir gently to combine. Repeat with remaining flour mixture and milk. Spoon into prepared pan. Smooth surface. Bake for 50 to 60 minutes or until a skewer inserted into the centre comes out clean.

4. Stand cake in pan for 15 minutes. Turn out onto a wire rack to cool completely. Spread icing over top and side. Top with chocolate curls, if using. Serve.

5. To make chocolate icing: Combine chocolate and cream in a heatproof, microwave-safe bowl. Microwave, uncovered, on MEDIUM-HIGH (70%) for 1 to 2 minutes, stirring every minute with a metal spoon, until almost melted. Stir until smooth. Set aside for 30 minutes or until thick enough to spread.

Notes & tips

* To make chocolate curls, run a clean potato peeler down the side of a block of chocolate, allowing curls to fall onto a plate.

* Taste.com.au is the place for food & recipes! Check out our latest collections including starters recipes, main recipes, drink recipes, Spanish recipes and autumn recipes.

Source

Super Food Ideas – May 2006, Page 76

Recipe by Alison Roberts

via Rich Chocolate Cake Recipe – Taste.com.au.

Chocolate Cake Recipe with Sour Cream Chocolate Frosting

A chocolate layer cake with sour cream and chocolate buttercream frosting.

chocolate to die for!

chocolate to die for!

Cook Time: 35 minutes

Ingredients:

* 3/4 cup unsweetened cocoa

* 1 3/4 cup sugar

* 4 large eggs

* 1/2 cup milk

* 1/2 cup butter or margarine

* 2 cups sifted all-purpose flour

* 1 teaspoon baking powder

* 1 teaspoon baking soda

* 1/2 teaspoon salt

* 1 cup sour cream

* 1 teaspoon vanilla extract

Preparation:

In a saucepan over medium low heat, combine cocoa, 3/4 cup sugar, 1 egg yolk, and milk. Cook, stirring constantly to prevent sticking, until thickened. Cool.

Cream butter until light and fluffy; add remaining 1 cup of sugar, beating until well blended. Add 1 egg and 2 egg yolks; mix well. Stir in sifted dry ingredients alternately with sour cream.

Add vanilla and cocoa mixture.

Beat remaining (3) egg whites until stiff; fold into cake batter. Line bottoms of three 8-inch layer pans with wax paper. Pour batter evenly into the three pans.

Bake at 350° for 30 to 35 minutes. Turn out onto racks and peel off wax paper. Cool. Frost with Chocolate Butter Frosting or your favorite frosting.

Chocolate Butter Frosting

* 1/2 cup soft butter

* 1 pound sifted confectioners’ sugar (about 4 1/4 cups sifted, 3 3/4 cups unsifted)

* dash salt

* 1 teaspoon vanilla extract

* 3 squares melted unsweetened chocolate

* 3 tablespoons heavy cream or half-and-half (more or less)

Cream soft butter; gradually add sifted confectioners’ sugar. Add dash of salt, vanilla extract, melted chocolate, and about 3 tablespoons of cream. Beat until smooth and spreading consistency, adding more cream if necessary.

via Chocolate Cake Recipe with Chocolate Frosting – Recipes for Chocolate Sour Cream Cake and Chocolate Butter Frosting.

Raspberry Truffle Tart

raspberrytruffletart1

Biscotti Crust:

8 ounces (225 grams) store bought biscotti, broken into pieces

5 – 6 tablespoons (70 – 84 grams) unsalted butter, melted

Filling:

1/3 cup raspberry sauce (recipe follows)

10 ounces (280 grams) semi sweet or bittersweet chocolate, chopped

1 cup (240 ml) heavy whipping cream

Raspberry Sauce:

1 cup fresh or frozen raspberries

2 tablespoons (30 grams) granulated white sugar, or to taste

Garnish:Fresh raspberries

Preheat the oven to 350 degrees F (180 degree C). Have ready a 8 – 9 inch (20 – 23 cm) fluted tart pan. Biscotti Crust: In your food processor, place the biscotti and process until finely ground.

Transfer to a bowl and add the melted butter. Stir to combine. Press this mixture over the bottom and up the sides of the tart pan. Bake in the preheated oven for about 15 minutes or until golden brown.

Remove from oven and place on a wire rack to cool completely before adding the filling.

Filling:

First, we need to make the raspberry sauce. Place 1 cup of fresh or frozen raspberries, that have been thawed, in your food processor and process until the raspberries are broken up. Pour into a strainer, set over a bowl, and press on the raspberries to extract the juice. Add sugar to taste. Set aside.

Place the chopped chocolate in a medium sized stainless steel bowl. Set aside. Heat the cream in a saucepan over medium heat. Bring just to a boil. Immediately pour the boiling cream over the chocolate and allow to stand for 5 minutes. Stir until smooth. Stir in 1/3 cup of the raspberry sauce.

Pour the chocolate filling into the baked and cooled crust, smoothing the top with an offset spatula. Cover and refrigerate overnight.

To Serve:

Cut into small slices and serve with fresh raspberries and with any of the remaining raspberry sauce.

You can also serve with whipped cream or creme fraiche. Makes one – 8 – 9 inch (20 – 23 cm) tart.

Serves 12 – 14 people.

Thanks to the Joy of Baking via Ashleigh’s space – Windows Live.

Three Vanilla Cupcakes.

20 regular cupcakes / 350 degree oven

3/4 cup (1-1/2 stick) unsalted butter, room temperature

1-2/3 cups vanilla sugar

2 large eggs, room temperature

2-2/3 cups flour

1-1/2 teaspoons baking powder

1/4 teaspoon salt

3/4 cup + 2 tablespoons milk

1 teaspoon vanilla extract

1/2 vanilla bean, seeds scraped out

1. Beat butter until softened. Add sugar and beat until light and fluffy, about 3 minutes.

2. Add eggs, one at a time, beating until well combined.

3. Measure the flour, baking powder, and salt into a medium bowl and whisk to combine.

4. Measure out the milk and vanilla and stir to combine.

5. Add about a third of the dry ingredients to the butter/sugar and beat to combine. Add about a half of the milk/vanilla and beat to combine. Continue adding, alternating between dry and wet and finishing with the dry.

6. Scoop batter into cupcake cups about 2/3’s full. Turn oven down to 350 degrees and bake cupcakes for about 22-25 minutes or until a cake tester comes out clean.

scraping vanilla seeds

scraping the seeds

Vanilla Bean Frosting

2 sticks (1 cup) unsalted butter, room temperature

1 package (8 ounces) philly cream cheese

2 teaspoons vanilla extract

1/4 vanilla bean, seeds scraped out

-4-5 cups powdered sugar

1. Using an electric mixer, beat the butter at medium speed until creamy.

2. Add the cream cheese and beat until combined.

3. Add the vanilla extract, vanilla seeds, and 3 cups of powdered sugar and beat at low speed, occasionally stopping to scrape the sides and bottom of the bowl, until light and fluffy. Add more powdered sugar to arrive at the consistency and sweetness you like.

Assemble

1. Frost each cooled cupcake with a healthy mound of frosting.

2. Top with vanilla seat salt or whatever you so desire.

filling frosting bag

filling the bag

frosting

frosting the cupcakes

I should mention… You should actually save the vanilla beans you scrape the beans out of and also use those to make vanilla sugar or reuse in some way as there is likely a lot of life left in them. Reminded by this post…

via Cupcake Bakeshop by Chockylit.

Macarons and Bittersweet Toffee Ganache

Basic French Meringue Macaron Batter:

(By Helen at Tartlette)

3 egg whites or 90g weighed

50 gr. granulated sugar (about ¼ cup)

200 gr. powdered sugar (about 2 cups of sifted sugar)

110 gr. blanched almonds, whole or ground (3/4 cup of whole almonds/1 and 1/8th cup ground)

In a stand mixer fitted with the whisk attachment, whip the egg whites to a foam, gradually add the sugar until you obtain a glossy meringue. Combine the almonds and powdered sugar in a food processor and give them a quick pulse if you use already ground almonds (that you have ground yourself separately) It will break the powdered sugar lumps and combine your almonds with it evenly. If you use whole almonds, pulse thoroughly for a minute or so. Add them to the meringue, and start to give quick strokes at first to break the mass and slow down. The whole process should not take more than 50 strokes. Test a small amount on a plate: if the tops flatten on its own you are good to go. If there is a small beak, give the batter a couple more folds.

Fill a pastry bag fitted with a plain tip with the batter and pipe small rounds (1.5 inches in diameter) onto parchment paper baking sheets. Preheat the oven to 300F. Let the macarons sit out for an hour to harden their shells a bit and bake for 10-12 minutes, depending on their size. Let them cool completely before filling. Pipe or spoon some of your filling on one shell and sandwich with another one.

Bittersweet Toffee ganache:

3/4 cup heavy cream

1 cup (8oz) bittersweet chocolate, chopped

1/4 cup toffee bits

In a heavy saucepan set over medium heat, bring the heavy cream to a boil. Remove from the stove and add the chocolate to it. Let stand 2 minutes and then stir until fully combined.

Add about 1/4 cup of toffee bits to the ganache once it is whisked.

Let cool until firm enough to put in a small piping bag.

Photography:

Macarons on Thomas Paul plates: Matt Armendariz

Macarons in box: Kristina Gill

via Design*Sponge » Blog Archive » in the kitchen with: thomas paul.

How To Make Cake Pops!

Cake Ball Mix

What you need

1 batch Dark Chocolate Cake

8 ounces cream cheese, softened

2 cups confectioner’s sugar

4 tablespoons butter

1 tablespoon milk (or more, as necessary)

Bake the cake and let it cool completely on a rack. This is a very moist cake, which is ideal for this recipe. It’s best to let it cool overnight at least. When it is completely cool, break the cake into a large bowl. Crumble it with forks or your fingers until it is in fine crumbs.

In a separate bowl, whip the cream cheese, butter, powdered sugar, and milk together until smooth. Pour into the cake crumbs and mix with a spoon. Then continue mixing with your fingers, kneading and mixing until fully incorporated into the cake. Check to see if it will roll into a ball. It should: this makes a very malleable, easy-to-handle cake mixture. But if it needs a little extra moisture, add milk a spoonful at a time.

When the mix is completely done, cover with plastic wrap and refrigerate until firm. You can leave the mix refrigerated for several days at this point. I left mine in the fridge for about three days before making the balls. You could probably also freeze this.

How to make the balls
Prepare two large baking sheets by covering with wax paper or parchment. Take a bit of the cake mixture and roll it into a smooth ball. If you want to use the lollipop sticks, stick one into the end of each ball, pointing upward, as you put the ball back down on the sheet. [Note: I cut the long lollipop sticks in half; they seemed a little long for the size of the balls.] Repeat until you’ve used up all the mixture. As each sheet fills up, put it in the freezer so that the balls harden.

How to decorate the cake pops
Melt chocolate or white chocolate in a double boiler on the stove. If you want to make the coating a little more resistant to melting, add a small square of wax to the pot and let it melt too. Stir well. Dip each ball into the chocolate until covered.

Dip in sugar, coconut, sprinkles, or anything else you’d like to decorate with. Put it back on the sheet to harden.

Don’t refrigerate these; it will cause the coating to weep or melt. They can be frozen, however.

via Apartment Therapy The Kitchn | How To Make Cake Pops.

Thank you – they are yummy -my kids love them!

Toffee Ginger Fudge Cup Cakes

INGREDIENTS

100g soft butter

100g light brown soft sugar

1 tsp ground ginger

1 tsp vanilla extract

25g golden syrup

100g self raising flour, sifted

2 medium eggs, beaten

To decorate:

Pieces of fudge (chunks cut into quarters)

For the fudgy icing:

25g butter

50g light brown soft sugar (or if you only have dark, that’s fine too)

2 tbsp single cream

100g icing sugar, sifted (can also be made using golden icing sugar which

gives a richer taste)

Serving Size : Makes 12

INTRODUCTION

I first made these in autumn because of the warming spicy ingredients. But in actual fact these are delicious at any time of year!

METHOD

1. Preheat the oven to 200°C, gas mark 6.

2. Line a fairy cake tin with paper cases.

3. Ensure all ingredients are at room temperature.

4. Either put all the ingredients into a food processor and mix until you have a smooth batter, or take the ‘traditional’ route….beat the butter

5. and sugar together until pale and creamy. Beat in the ginger, vanilla and golden syrup until combined. Add the beaten eggs, then gradually add a little flour at a time. Spoon into the paper cases and bake in the oven for 15-20 minutes until golden and well risen.

6. Place on a wire rack to cool. Meanwhile, make the icing…

7. Melt the butter and brown sugar in a small saucepan. I like to cook it til its a dark golden brown so the flavour tastes nice and deep! Although do be careful it doesn’t burn.

8. Gently bring to the boil then add the cream and simmer for 5 minutes.

9. Remove from the heat and beat in the icing sugar until smooth. If the icing becomes too stiff, add a tablespoon of boiling water and beat again.

10. Spread the icing over the cakes and decorate with chunks of fudge.

ADDITIONAL INFO

The cooked cakes can be frozen un-iced. When ready to ice, thaw them and ice them. The cakes will keep for up to 3-4 days in an airtight tin in a cool place.

via WELCOME TO NIGELLA’S WEBSITE.

Jamie Oliver – Recipes – chocolate biscuits with soft chocolate centres

chocolate biscuits with soft chocolate centres

Wow - check these babies out!

ingredients

• 140g/5oz butter

• 140g/5oz caster sugar

• 2 egg yolks

• 255g/9oz self-raising flour

• 30g/1oz cocoa powder

• 30 squares of chocolate (milk, white or plain)

The deep rich cocoa colour of these biscuits really comes to life against a pure white background. So when you make a batch for your mum, give it to her on a plate from our Coco range of fine bone china.

serves Makes 30 biscuits

This is a great recipe to do with kids, as it’s very simple and good fun putting the top circle over the chocolate and squashing the edges gently together to stop the chocolate escaping when it cooks. This is quite a dry mixture, but don’t worry, they are meant to look a bit cracked and rustic, so you can’t really go wrong! If you eat these when they have just been cooked the chocolate is quite runny, and if you eat them cold they are nice and gooey. You’ll need two cutters, one about 4cm/1½ inches and the other about 5cm/2 inches.

Grease a large baking sheet. Cream the butter and sugar together until pale. Beat in the egg yolks, then add the flour and cocoa powder to make a dough. Turn out and knead, then pop it into the fridge for a while. Preheat the oven to 190ºC/375ºF/gas 5.

On a lightly floured surface, roll about a third of the dough out thinly, then cut out about 30 circles with the smaller cutter (you can do fewer if you want the biscuits bigger). Spread them out on the baking sheet and put a square of chocolate in the middle of each one – make sure you use all the chocolate however many you do. Then roll the rest of the dough out (I always add the leftovers from the first lot of cutting to it and knead it a bit). Cut out the same number of circles with the larger cutter and pop them on top of the chocolate, pressing gently all the way round to seal the edge and keep all the chocolate in.

Cook in the preheated oven for 10 minutes, and eat them hot or cold.

• from Happy Days with the Naked Chef

Jamies Fab book!

More Dessert recipes

via Jamie Oliver – Recipes – chocolate biscuits with soft chocolate centres.

Ultimate Flourless Chocolate Cupcakes « Pennies on a Platter

Ultimate Flourless Cupcakes 2

flourless-cupcakes-468x320

Ultimate Flourless Chocolate Cupcakes (adapted from The Cupcake Calendar)

Printable Recipe

1 1/2 cups (10 1/2 oz) bittersweet chocolate chips

1 cup (2 sticks) butter

4 eggs

4 egg yolks

1/2 cup sugar

2 tbsp  cocoa powder, sifted

1 tsp vanilla extract

Preheat the oven to 375˚F. Place 12 paper baking cups in a muffin pan. Put the chocolate and butter in a double boiler, or medium bowl over a pan of simmering water, and stir until completely melted. Set aside to cool. In large bowl, cream the eggs and sugar with an electric mixer until pale and thick. Gently fold in the melted chocolate and remaining ingredients.

Spoon the batter into the cups. Bake for 20 minutes. Remove pan from the oven and cool for 5 minutes. Then remove the cupcakes and cool on a rack.

Bring back your elementary school craft skills and cut a heart shape out of wax paper. Use both the die-cut and the stencil shape to cover the cupcakes and sift the powdered sugar over top to make your heart topping.

Try giving these to your Mum! She will love them.

Recipe from:

http://penniesonaplatter.wordpress.com/2009/02/12/ultimate-flourless-chocolate-cupcakes/

Chocolate Caramel Apple Pie!

Chocolate Caramel Apple Pie

Even the most culinary-challenged among us can, on that rare occasion, bring grown men to their knees with that one dish (okay now I am really over-promising). This Chocolate Caramel Apple Pie is most appreciated by those with a sweet tooth and a penchant for rich desserts. And, hey, if I can make it, anyone can.

Enough preamble already. All you really came to the party for was the damn pie! So without further adieu…

Hit the market to buy:

– 1 frozen pie crust with a lattice top (for us mom’s with no time – or make your own crust if you are so talented – for simplicity, this is the lazy ass version)

– 2/3 cup of sugar

– 2 tbsp flour

– 3/4 tsp cinnamon

– 1/2 cup whipping cream

– 6 cups peeled, sliced apples (I like Macs but choose your own fav)

– 2 (or more) Caramilk chocolate bars

– 1 tbsp brown sugar

– 1 tbsp cream

– 1 additional tbsp sugar

Get Busy:

(note this is for the lazy ass version – adapt for your own crust)

1. Thaw pastry at room temperature for about 30 minutes.

2. Combine 2/3 cup sugar, flour, cinnamon and whipping cream in a large bowl.

3. Add apples and mix gently.

4. Place half the mixture on the bottom crust.

5. Break Caramilk chocolate bars into squares and place evenly on apple mixture in crust (plus stick some of those babies down between the apples).

6. Add remaining apple mixture, covering the chocolate.

7. Sprinkle brown sugar over apples.

8. Moisten edge of bottom crust. Place top pastry over filling , seal and flute edge.

9. Brush crust lightly with cream and sprinkle evenly with 2 tbsp of sugar.

10. Place pie on piece of foil on baking sheet (trust me on that part it can get sticky if you over-filled) and put on lower rack of oven.

11. Bake at 450F for 10 minutes. Reduce heat to 350F and bake 35-40 minutes.

12. Dig in.

Or in other words… take your favourite apple pie recipe and stuff in a pile of Caramilk chocolate bars and you too can be a one-hit-wonder rockstar. The chocolate and caramel melt into the pie and the flavour combo is … well… you’ll see.

Now that I’ve surrendered my best (okay only) recipe … I challenge you to do the same.

via Blog Chocolate: Recipes.